Halloween skittles manicure
This week at work has been one of the worst I've ever had. Constant fights, tantrums, a lack of doctors, crazy workload.. It's full moon so everyone is going bat crazy! I needed to relax so I decided to take some time out and do a Halloween skittles mani. I'm loving doing different designs on each nail, it's a lot of fun plus I get to try some of my many untrieds!

My WAH nail pic =p
I wish I could spare more time so I could do more full manicures with the designs. I got inspiration for these designs from some of the great blogs I follow! I think my left hand turned out really well but my right hand was pretty much a fail because nothing I wanted actually turned out properly. My middle finger was supposed to be candy corn but my polishes would not cooperate! So I gave up and just used trusty Grape Pop and flakies instead.

Left hand:
Thumb: 2 coats of Color Club Wild at Heart with freehanded spider web using Kiss nail art striper in white.
Index: 2 coats of Sinful Colors Mint Apple as base, BYS Black Satin for the hair, CM nail art pen and striper in white and black for eyes and Kiss nail art striper in black for the mouth.
Middle finger: 2 coats of Essence Undead with Pa witch nail sticker.
Ring finger: 2 coats of Sinful Colors Cloud 9 with pumpkin design from Konad plate m13 using Konad special polish in black.
Pinky: Rimmel I love lasting finish in Double Decker Red with spider design from Bundle Monster plate BM13 using Konad Princess polish in Black pearl.

Right hand:
Pinky: 2 coats of Sinful Colors Big Daddy and 1 coat of BYS Cracked polish in black.
Ring finger: 2 coats of of The Face Shop OR202 with bat design from Bundle Monster plate BM13 using Konad Special polish in black.
Middle finger: 2 coats of China Glaze Grape Pop and 2 coats of Nubar 2010.
Index finger: 1 coat of BYS Black Satin with skull design from Konad plate m13 using China Glaze Devotion.
Thumb: 2 coats of Essence Undead, Kiss nail art striper in black for vertical stripes and spider design from Bundle Monster plate BM13 using China Glaze Devotion.
WHEW! I'm knackered now. Which design do you like the best? I'll be MIA for the next few days as my exam for my final subject is being released tomorrow so I'll be attempting to steer clear of browsing blogs and the net until it's due on Wednesday. Here's hoping x) Thanks for looking!
My Polished Pink for October giveaway ends in 2 days so don't forget to enter here!
Swap with Jess from polish insomniac
I completed another awesome swap this week! Swapping is so much fun – I love meeting fellow polish lovers and the process of shopping and choosing polishes is very enjoyable =) This time I swapped with the lovely Jess from polish insomniac. She answered my call for swap buddies a few months back but I couldn’t swap til a few weeks ago. She managed to cross a few things off my wishlist which I am SO grateful for! Here are the goodies she sent my way:

The colours are just so pretty and include some brands I haven't tried before!

From L – R:
Sally Hansen Complete Manicure Hidden Treasure, Lagoon, Kook-A-Mango and Thinking of Blue. HIDDEN TREASURE!!! Need I say more? *dance* Lagoon is so so pretty, it reminds me of Gosh Ocean actually. I've very much wanted to try the Complete Manicure range however the prices down under are just ridiculous.

From L – R:
Wet n Wild Lust, Saved By The Blue and Orly Lollipop. My 1st Wet n Wild polishes and an Orly polish crossed off my wishlist - thanks Jess!

From L - R:
Jordana Mint Candy, Sinful Colors Mint Apple and China Glaze Metallic Muse. Some wonderful greens that I'm so excited to add to my collection! I've had Metallic Muse on my wishlist for aaaages now for konading so yay!
As soon as my exam is over next week I am going to have to polish my nails daily or at least 2nd daily! I have so many gorgeous polishes to try it's not funny. Thank you for these wonderful polishes Jess!
My Polished Pink for October giveaway ends in 3 days so don't forget to enter here.
Pinktacular manicure!
It is fast approaching the end of October and I came to the realisation that I still have so many pinks I want to feature for Breast Cancer Awareness Month, especially the China Glaze Fight Like a Woman polishes I hauled! I have a busy week coming up (exam time!! *cries*) so there was going to be no way I could feature all the polishes individually by Sunday. Then I saw this lovely “super pink” mani by Katrina from Katrina's blog and I just knew I had to try it. It is so pretty and kawaii! I got my 1st Nail Up! mag the other week and have been meaning to try out a look like this but never got around to it. I took some inspiration also from WAH nails as they are the experts of this style and they are just so so cool. Here’s my "pinktacular manicure"!

My attempt at a WAH nails pose! =p
It took longer than I expected because I didn’t know what I wanted to do! I should have been preparing for my exam instead but oh well =p
The main polishes I used for this mani:

From L - R:
China Glaze Endurance - a gorgeous pinky/red jelly with glass flecks through it.
China Glaze Encouragement - a baby pink with silver shimmer through it. Very subtle, classy and oh so pretty!
China Glaze Empowerment - candy pink creme which is a little streaky to apply so I’d recommend thin coats.
BYS Pink with a Punch - a super bright pink that is so pigmented that only 1 coat is needed – awesome.
Ulta 3 Party Shoes - which is a gorgeous hot pink from Ulta 3’s latest range I believe. I absolutely love pinks like this!
Visee RO 602 - a pretty red and silver glitter!

Left hand:
Thumb: 2 coats of China Glaze Endurance with silver and pink rhinestones and heart dazzlings.
Index finger: 2 coats of China Glaze Encouragement with Visee RO 602 red glitter applied on the top half of the nail. I kept stuffing this nail up and in the end I went with a lazy persons gradient haha. I’ll definitely be trying out a proper gradient mani soon! Even though this nail gave me the most trouble I ended up liking it the most.
Middle finger: 1 coat of BYS Pink with a Punch with pink rhinestones. My 1st attempt at half moons! It wasn’t actually as difficult as I thought it would be which is nice. Plus the rhinestones helped cover up the dodgy edge!
Ring finger: 2 coats of China Glaze Empowerment and Kiss nail art striper in white to apply diagonal stripes.
Pinky: Ulta 3 Party Shoes applied on the tip and Kiss nail art striper in silver glitter applied on the smile line.

Right hand:
Pinky: 2 coats of Ulta 3 Party Shoes with Kiss nail art striper in black for the vertical stripes.
Ring finger: 2 coats of China Glaze Endurance with CM Nail Art gold glitter striper applied for the (rather dodgy) half moon.
Middle finger: 2 coats of China Glaze Encouragement with a thick stripe of BYS Pink with a Punch down the middle and silver rhinestones.
Index finger: 2 coats of China Glaze Empowerment with Pink Fin floral nail sticker.
Thumb: 1 coat of BYS Pink with a Punch applied to the tip with Kiss nail art striper in white and silver glitter applied to the smile line.
Which is your favourite design? Thanks for looking! Don't forget to enter my Polished Pink for October giveaway here.
My nail polish storage - updated
I've moved back home into my new room so I thought it called for new nail polish storage. I still absolutely love the clear storage boxes that I used (see my previous nail polish storage post) however my polish collection has expanded to the point that boxes are stored here and there in my room which was annoying the crap out of me. Like I've said, I am way OCD about organising stuff. I couldn't organise the boxes the way I wanted them so I finally caved and bought myself an Ikea Helmer!

I picked white because it matches the rest of the furniture in my room. Besides going halves with me for the Helmer (I was still ummmming and ahhhing in the store which the boy HATES so he said he'd help out just to get me out of the store I think!) the boy was also very kind and assembled it for me =D After assembling it he said that he doubted I could have assembled it myself what with the folding of metal etc.. I couldn't agree with him more after seeing the instruction booklet!
While I was at Ikea purchasing my Helmer, I picked up a roll of Rationell Variera drawer mat which you can use to line drawers for pots and pans etc. I bought it so that my polishes wouldn't slip and slide when I pull the drawers out but according to the Ikea website it's main purpose is to protect drawers against scratching and also to dampen sound.
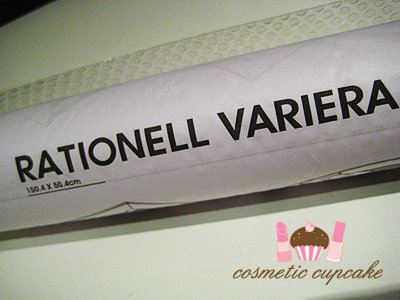
It's clear and comes in a roll which you then cut to size yourself. I placed one of the empty drawers on top of the mat, marked the size and then cut out accordingly. The 1st piece was trial and error to get the exact size so cut out more than you need and then trim to fit is my suggestion.

I almost gave up using it. The curl is SO strong that even after 2 nights of being flattened by 4 of my 5kg nursing textbooks it was still curling up. I was ready to throw them out in frustration and for having wasted $3.99 (special price with the Ikea Family card!) but my sis suggested I Google a solution. Lucky I did! One of the tips I looked up suggested soaking cut out sheets into hot water to flatten it. I did this for about 3-5minutes per sheet which flattened them mostly. For extra measure I stuck them under my textbooks overnight again. Worked like a charm! Then I lined the bottom of each drawer with them.

I decided to organise my collection by brand, collection and where the polishes are from. I like to have polishes in their neat little families ok =p
On the top of my helmer I've got my manicure essentials box, removers, nail stamping plates and cotton pads and tips. My nail dryer isn't shown in the pic but I keep it on top as well:

1st drawer holds treatments (base and top coats, hardeners, cuticle softeners etc.), konad polishes, nail art stripers and nail wheels:

2nd drawer is China Glaze polishes:

3rd drawer is OPI, Color Club, Essie, Orly and misc. higher end polishes:

4th drawer is for my lovely European polishes - Catrice, Essence, Barry M, Hema, Art Deco, S-he etc.:

5th drawer is for my awesome American and Asian polishes - Sinful Colors, Claire's, Sally Hansen, Rimmel, Pa, Elianto etc.:

And the lucky bottom drawer is for my Aussie polishes! Ulta 3, BYS, Glitter Gal etc. I actually have about double the amount shown here but I've lent them to girls at work. It crossed my mind to ask for them back for a night just for this post but I couldn't very well do that haha =p

I am so happy I got my Helmer! It is a great solution for nail storage and it is so sleek and compact. At the rate I'm going buying nail polish I will probably need another one next year which is definitely not good! o_O
I want to mention that I've updated my blog with some pages at the top including a "where to buy" guide on my best kept places to buy nail polish - both international and local brands. The guide is mainly geared towards Sydney ladies but includes my favourite online sellers too.
I hope you enjoyed this post! Don't forget to enter my Polished Pink for October giveaway here!
Halloween Jack O' Lantern flakie manicure
I have for you today my 1st ever Halloween manicure - a quick and simple NOTD using flakies and nail stickers. We don't really celebrate Halloween here Down Under however in recent years the presence of Halloween has increased. I would LOVE to go to the States during Halloween to enjoy the festivities!

I started off with a coat of BYS Black Satin which I've featured in a previous post. I then applied 2 coats of Nubar 2010 flakie to get an orangey look. FLAKIES!! I just love the way flakies look and the way they look different depending on the lighting. I couldn't stop staring at my nails and my workmates were all gaga over the flakies too and they loved this mani!

I then applied these totally awesome Pa Jack O' Lantern nail stickers (which I got from lovely Christina!) on my accent fingers and thumbs. I then topped it off with a coat of Poshe topcoat.


On day 2 of wearing this I decided to matte-ify it using Essie Matte About You.

I love the matte look! I think the flakies look even better and stand out so much more when matte. What do you think?
Thanks for looking! Don't forget to enter my Polished Pink for October giveaway here!
Franken Black Rose NOTD
I have for you today a gorgeous franken sent to me by Chris in our latest swap package. I was most excited to try her frankens out of all the awesome polishes she sent me! I used Chris' beautiful franken Black Rose for a quick NOTD on the weekend. You can read Chris' original post including recipe here.
Before you read on about this great franken, I want to let you guys know that I'm getting a lot of nail breakages at the moment unfortunately so my next few manis will look a bit wonky =( When I did this NOTD my middle finger nail had broken but now both index finger nails are broken too! 4 in one week! I'm not happy at all to say the least because they broke on an angle and are kind of hard to file down nicely. So please bear with me while my nails grow out!

I absolutely love this franken <3 It is vampy, sexy and like Chris says perfect for Halloween. Black Rose is a purpley-reddish black with dark shimmer and is just gorgeous. I got sooooo many compliments when I wore it! I didn't even do any nail art - that is how much I loved the colour on it's own! All pics are 2 coats with Poshe topcoat. I actually managed to take some pics when there was sunlight omg! Black Rose looks different in different lighting (I love when a polish can do that because it's like 2 different polishes!) so below are pics in natural and artificial light. I hardly ever have time to take pics during the day so enjoy the pics!
Close up (natural light):

Close up (artificial light):

I love the shimmer through the polish. The grey shimmer is most evident in the bottle - on the nail the shimmer looks more purpley/red.

Thank you for sending me this wonderful franken Chris! Don't forget to enter my Polished Pink for October giveaway here!
Ulta 3 Pink Supreme floral NOTD
It’s been requested I feature more Aussie polishes on my blog so I have for you today a floral manicure using a pretty pink polish from great Aussie brand Ulta 3. I actually have quite a few Aussie polishes and they are fantastic so I have no idea why I don’t use them more! I will try to use them more often so international ladies can see what we have on offer Down Under.

I used Ulta 3 Pink Supreme which is a frosty light pink polish with pink and gold shimmer through it. It's soooooo pretty!! It’s very work appropriate and is lovely and shimmery. It applied a little thick but it wasn't difficult to work with - it's probably best to do 3 coats for full coverage. Below is 2 coats with some VNL but I was planning to konad on top so I left it. Don't take any notice of the bald patch on my pinky!

Close up:

I then kondaded floral full nail design from Konad plate m73 using China Glaze Passion. I then added a fimo clay flower on accent fingers and thumbs and topped it all off with a coat of Poshe topcoat. I hauled Poshe topcoat recently in my first order from Transdesign!

You can win your own bottle of Ulta 3 Pink Supreme in my Polished Pink for October giveaway here!
Thanks for looking =D
Another swap with Chris from Lacquer Wear for Tips and Toes
Chris from Lacquer Wear from Tips and Toes is another awesome blogger lady I've had the pleasure of getting to know through our love of nail polish! When we 1st swapped we decided on doing it in 2 parts so here is the 2nd part of our swap which I received this week (see the 1st part here). This post will be light on words as I'm not feeling 100% at the moment but I just had to post about this awesome package!

So many pretty polishes!! Chris was very sweet and wrote little notes explaining the polishes too as some of the polishes are firsts for me.

From L - R:
Arissa colorvantage in rockin' amethyst, Sinful Colors Deep Red Ocean, Savvy Andrea's Mint, Borghese Stellare Notte and Art Deco gold glitter. Chris kindly special ordered the Sinful Colors for me as she knew it was on my wishlist! Another lemming crossed off my list *dance* and my 1st Borghese!!!
From L - R:
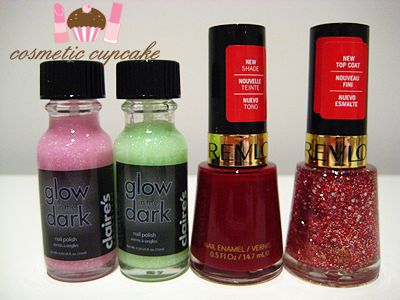
Claire's Glow in the Dark polish, Revlon Ruby and Revlon Slipper. Glow in the dark polishes and glitter Revlon = happy 'chelle!

Chris also kindly included 2 of my favourite frankens she's done yay: Accidental Blues and Black Rose. I still haven't had time to try out her fantastic franken tutorial =(

Thoughtful extras she included for me!

Candy corn YUM! My sis has devoured about half the packet already LOL.
Thank you for another great swap Chris! =D I can't wait to try out all the lovely polishes you sent me - especially your frankens!
Thanks for looking! Don't forget to enter my Polished Pink for October giveaway here.

So many pretty polishes!! Chris was very sweet and wrote little notes explaining the polishes too as some of the polishes are firsts for me.

From L - R:
Arissa colorvantage in rockin' amethyst, Sinful Colors Deep Red Ocean, Savvy Andrea's Mint, Borghese Stellare Notte and Art Deco gold glitter. Chris kindly special ordered the Sinful Colors for me as she knew it was on my wishlist! Another lemming crossed off my list *dance* and my 1st Borghese!!!

From L - R:
Claire's Glow in the Dark polish, Revlon Ruby and Revlon Slipper. Glow in the dark polishes and glitter Revlon = happy 'chelle!

Chris also kindly included 2 of my favourite frankens she's done yay: Accidental Blues and Black Rose. I still haven't had time to try out her fantastic franken tutorial =(

Thoughtful extras she included for me!

Candy corn YUM! My sis has devoured about half the packet already LOL.
Thank you for another great swap Chris! =D I can't wait to try out all the lovely polishes you sent me - especially your frankens!
Thanks for looking! Don't forget to enter my Polished Pink for October giveaway here.
Rose manicure
My rose manicure today is inspired by this gorgeous rose mani by Christina. As soon as I saw the mani she did for her friend I knew I would have to try it for myself! Roses are one of my favourite flowers (orchids are my favourite) and in combination with the glitter and red is just so so pretty.

I decided to use Korres Watermelon which Christina sent me in our latest swap. I’ve never tried Korres polishes so I was very excited when Christina told me she was sending me some my way. We can purchase some Korres products Down Under but they are pretty exxy (what isn’t beauty wise??) and I’ve never seen the polishes before online or in store.
Watermelon is a watermelon red crème. It is a beautiful pinkish red polish and I love it =) It is super pigmented and only 1 coat is needed for complete opacity!! The brush was very easy to use too – a little short but not difficult at all to handle. It applied very smoothly and I would have had no cleanup at all except I painted 2 fingers wonky. It dried very quickly and to a glossy finish. I love the shape of these bottles too! It was hard to capture the proper colour of Watermelon - it’s a little darker in real life than what’s pictured below.

As I don’t have the wonderful 3D rose stickers Christina used for her mani, I substituted by konading roses from Konad plate m13 using Konad Special polish in white on accent and middle fingers. I then used China Glaze Fairy Dust to add a diagonal strip of glitter on accent and middle fingers above the roses and painted remaining fingers with Fairy Dust. Topped it all off with a coat of Poshe Fast drying topcoat! Looking back I wish I had used a more dense glitter (like the Kate glitter Christina sent me!) but oh well.

Hope you like it! Enter my Polished Pink for October Giveaway here.
Review: b•liv by cellnique skincare
Hi ladies! How have you all been?
I have been meaning to do this review for quite some time now but with the move and everything I didn't get around to it until now unfortunately. My skin is far from perfect - I have dryness, uneven skin tone, redness, blackheads, breakouts and also acne scarring on my chin and around my mouth. I would love to be able to walk out of the house without any makeup during the day but alas that has not happened for years. Selina from b•liv by cellnique was very kind to offer some of their products for me to try a little over a month ago. She asked me what skin issues I had and sent me some full size skincare products to try out. I had been looking for a new skincare regime to use as I wasn’t seeing significant results from my last skincare range. b•liv by cellnique also seemed like a company with a great philosophy so this was perfect timing.
“b•liv by cellnique is driven by advanced, bio-technologically-formulated ingredients and a decade’s-worth of expertise in the beauty salon industry. Each b•liv product features a multifunction system that efficiently release ingredients based on the skin’s needs. b•liv was also developed to create immediate results for youth requiring products that are sophisticated, but whose functions are simple-to-understand and easy to use.”
I was sent the following products to try:

Squeaky Clean cleanser
Off with those heads treatment
Quench Me moisturiser
Glow and Shine
Leach Me mask
I have been using these products exclusively for the last 4 weeks. The products arrived quickly and were packaged really well. Straight off I loved the packaging of the products – sleek, clean, simple and appropriately packaged for the product.
Here’s a rundown of the products and how I went with them:
Squeaky Clean - beads cleansing gel

Main Function: Cleansing + exfoliating + oil control
What they say: “This ultra-gentle exfoliating cleansing gel added with micro-beads helps you kick out impurities and remove excessive oil. The cleanser lets you say ‘hi” to clean pores and “bye” to those heads by making blackheads and whiteheads removal simple.
Use: daily morning and night
Squeaky Clean is the cleanser from the Blackheads range. It comes in a pump dispenser which is great and also includes a little stopper thing to prevent acidentally dispensing the product (I'm weird - I love these little plastic things because they make it easy to transport without getting it everywhere!). It has a grainy texture as it contains microbeads and smells sort of minty which took a little getting used it. The smell hits you 1st thing in the morning and wakes you up!

Squeaky Clean lived up to its name for me and made my skin feel very clean without drying my skin at all. It feels very refreshing and I liked the gentle exfoliating effect. It also didn't break me out or cause any skin irritations which can occur when I switch skincare routines. I really like using it and I would definitely consider repurchasing. The only thing I dislike is that it is a small bottle and after a month I have used 75% of the bottle already.
Off with those heads - blackheads sebum gel treatment

Main Function: Clear blackheads + whiteheads
What they say: "Say goodbye to painful squeezing! This light cooling gel promises to remove stubborn blackheads and whiteheads painlessly in just 14 days of application and stop them from appearing ever again. It keeps excessive oil secretion under control and skin irritation will never rule again."
Use: Daily – morning and night after cleansing

Off with those heads is the blackhead treatment from the Blackheads range. It’s a clear gel in a pump dispenser also with a slightly sticky texture and a chemically smell. When you apply it the 1st time it does sting a little and unfortunately at first it can make the areas you apply it on quite oily.

Unfortunately I've only noticed small differences after using this serum for over a month. My blackheads are still visible however my pores are smaller than before I started using Off with those heads. I was really hoping to see fast results like other ladies but I’m going to continue with it in the hope of seeing better results. I think I have weird skin and stubborn blackheads ho hum =S
Quench Me - moisturising gel

Main Function: Moisture replenishing & retaining + cell revitalizing
What they say: "A super lightweight gel moisturizer, Quench Me invigorates your skin with its moisture-retaining properties, keeping hydration locked in during daytime with no burden. Your complexion never looked more supple, recharged and healthy!"
Use: Daily – morning and night

Quench Me is the moisturiser from the Dry range. It's a lightweight gel (also with a pump dispenser) that’s pastel blue coloured and has a light smell. I really enjoy using gel moisturisers as they don't feel heavy on the skin.

Quench Me absorbs very quickly into the skin and doesn’t feel oily or leave a sticky residue. It made my skin feel very soft and supple which was lovely! I felt however that it wasn't moisturising enough for my skin. My skin tends to get quite dry especially in Winter and I had some dryness around my nose and chin area after using this. It may work for other ladies whose skin isn't so dry though so give it a go. I wouldn't consider repurchasing this Quench Me.
Glow and Shine mask - skin smoothening mask

Main Function: Exfoliating + pores reducing + brightening
What they say: "Reveal your smooth and flawless complexion with this scrub mask. Glow and Shine deep cleanses, polishes and moisturizes your skin. It also lightens and brightens the dull and uneven toned face, and brings out the inner glow and shine. Scrub away flaws and imperfections!"
Use: Once a week after cleanser

Glow and Shine is from the large pores range. It is like a clay mask with little beads. It smells divine – like blackcurrants or something and you apply a thin layer after cleansing. It stings a little when you first put it on (I have dry cheeks) but I find this with other clay masks too.
I ABSOLUTELY LOVE THIS MASK. This made my cheeks feel as smooth as a babies bottom from the 1st time I used it - I kid you not! Glow and Shine is definitely my favourite from all the products I was sent to try. My skin was SIGNIFICANTLY smoother and brighter after using the mask. The price is a little exxy but for all the good it does for my skin I am DEFINITELY going to repurchase.
Leach Me - moisturising mask

Main Function: Deep moisturizing + brightening + age preventing
What they say: "A 3-in-1 hydrating mask, Leach Me moisturizes, prevents signs of aging and restores your healthy glow. Bursting with natural fruity ingredients, this mask acts fast in penetrating these nutrients into your skin. Your lines will refine, your dryness will vanish, and the mirror will reveal a beaming face once again!"
Use: 2- 3 times weekly after cleansing
Leach Me is a mask from the Dry range. It's a soft cloth sheet mask which I found very hydrating. The mask is FULL of serum - I left it on for 30mins and there was loads of excess serum. The serum took a little while to absorb into the skin but it was moisturising. I didn't see as much brightening effect as the Glow and Shine mask however I was only sent one mask to try so I can't say whether or not it lives up to its claims. The mask was a little too big for my face but I find most sheet masks a little big. I was only sent one mask but I would love to purchase more.
Overall, I am quite pleased with the results I've gotten from using the above b•liv by cellnique skincare products. My skin is still very far off from looking flawless but it FEELS better – smoother, healthier and cleaner. The products didn’t dry out my skin or break me out which happens sometimes when I change skincare products. I would definitely repurchase Squeaky Clean cleanser, Glow and Shine mask and Leach Me.
b•liv by cellnique would like to offer free samples of Off with those heads (3ml) to my readers! The first 50 readers who email their full name and mailing/shipping address to fbfreesample@blivskin.com with the subject cosmeticcupcake.com will receive a sample. Readers that send in their blog’s url might stand a chance to do a product review too! This great offer ends 1 week after my product review being posted and sample delivery within 4 – 6 weeks.
A big thank you to Selina from b•liv by cellnique for providing me with products to sample. You can purchase b•liv by cellnique skincare products from their website .
I was sent these products to sample but this in no way influenced my review in any way. All my reviews are my 100% honest opinion.
Subscribe to:
Posts (Atom)


