Showing posts with label OPI. Show all posts
Showing posts with label OPI. Show all posts
OPI Big Apple Red
Today I have an oldie but a goodie shade for you all! Every girl needs at least one red creme in their stash and sometimes it's hard to choose the right one since there are about a million and one different reds out there. I tend to go for blue based reds but OPI Big Apple Red is a classic red and one that I reach for quite often these days. It's a gorgeous orange based red and is perfectly opaque in 2 even coats and dries to a high gloss finish.
is a gorgeous orange based red that I reach for quite often these days.


Details: Available from the usual OPI stockists for $19.95
Whats your favourite red polish? My long time favourite red is Rimmel's Double Decker Red (you can see a super old swatch of it here) but I have a really old bottle and they have a new formula now I think which is slightly different to the original.
Thanks for looking as always!
The product featured in this post were provided to me for consideration but this in no way influenced my review in any way. As always, my reviews are my 100% honest opinion. My Disclosure Policy can be viewed here.
is a gorgeous orange based red that I reach for quite often these days.
Details: Available from the usual OPI stockists for $19.95
Whats your favourite red polish? My long time favourite red is Rimmel's Double Decker Red (you can see a super old swatch of it here) but I have a really old bottle and they have a new formula now I think which is slightly different to the original.
Thanks for looking as always!
The product featured in this post were provided to me for consideration but this in no way influenced my review in any way. As always, my reviews are my 100% honest opinion. My Disclosure Policy can be viewed here.

Beach manicure
It is swelteringly hot here in Sydney at the moment and it's not even summer yet. Our place doesn't have air conditioning so I've been hiding out with all the blinds closed when not at work haha. With that in mind I thought it was time for a summery mani to go with the weather and what better way than with a beach manicure! It was a bit of a fail though because my top coat bubbled but I guess it unintentionally adds to the beach and sea theme so let's just say I did it intentionally ok!

I started off with 2 coats of Kester Black Blueberry Tart* (you can see my swatch of it here) as my base and then sponged OPI Glitzerland to the base of each nail for the sand. I then stamped wave design from Bundle Monster BM-509 using Konad Special polish in white and added a coat of China Glaze Snow Globe. To finish it off I added a gold shell stud and some different sized pearls.


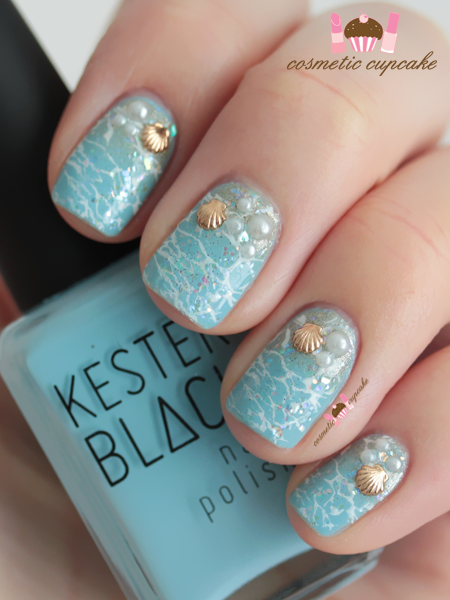
What do you think of my beach mani? Hope you're all having a fab weekend and for the Aussie girls that you stay cool! Thanks for looking as always!
* Product(s) provided to me for consideration but this in no way influenced my review in any way. As always, my reviews are my 100% honest opinion. My Disclosure Policy can be viewed here.
I started off with 2 coats of Kester Black Blueberry Tart* (you can see my swatch of it here) as my base and then sponged OPI Glitzerland to the base of each nail for the sand. I then stamped wave design from Bundle Monster BM-509 using Konad Special polish in white and added a coat of China Glaze Snow Globe. To finish it off I added a gold shell stud and some different sized pearls.
What do you think of my beach mani? Hope you're all having a fab weekend and for the Aussie girls that you stay cool! Thanks for looking as always!
* Product(s) provided to me for consideration but this in no way influenced my review in any way. As always, my reviews are my 100% honest opinion. My Disclosure Policy can be viewed here.
NCLA x Hello Kitty Bows nail wraps
I may be nearing 30 (EEK) but my love of the super cute Hello Kitty still continues. It's her 40th anniversary this year so to celebrate NCLA devoted their latest nail wrap collection to everyone's favourite kitty. The range consists of 8 nail wraps featuring bright neon, bows and floral designs. There's a design to suit every Hello Kitty lover!

What they say:
"Do your nails instantly! No heat lamp, no drying time and no waiting required! All you need is clear polish. Try it, and you'll have a well-designed and polished look to complement any outfit in no time. ;) Channel your inner Hello Kitty with this bow-bedecked design that nods at her fab trademark accessory."

Being the nailhoarder collector I am I wanted all the designs but I was good and only purchased the floral and bows designs! Seriously SO DAMN CUTE.

The nail wrap sets include 26 ultra thin self adhesive nail wraps, an adorable NCLA Hello Kitty nail file and easy to follow instructions on the back of the packaging.

The wraps are super simple to apply in just a few quick steps - check out this video by the awesome Steph Stone on how to apply the wraps. First you clean your nails using acetone or polish remover; apply base coat; choose the correct wraps for your nails and apply by stretching until they fit perfectly and flatten firmly; file any excess using the nail file and then finish off with topcoat. I found the wraps really thin and flexible so they molded easily to the nail and made them easy to manipulate. It also only takes very gentle pressure to file the excess nail wrap off which means less stress to the natural nail which is always a plus!


I used the bow nail wrap as an accent nail for this mani and I paired it with OPI Big Apple Red and it took me literally only 10mins from start to finish before I had to rush out the door for dinner. Too easy!


Overall: I've never been a massive fan of nail wraps but these NCLA have me addicted. It also helps that these are Hello Kitty designs of course! I love that the nail wraps are super thin so they molded easily to my nails - other nail wraps I've tried feel really bulky on the nail which I find so annoying and end up picking them off straight away. You've got plenty of time to stretch and manipulate the wraps on the nail to get the perfect fit and there's a good range of sizes to fit most nail shapes. The sizes are geared more towards ladies with larger nail beds like moi so ladies with smaller nail beds might have to cut them down to size.
I haven't been changing my polish as regularly these days so I wore this mani for a good 5-6 days before I got sick of it and the wraps were still going strong. I applied a coat of top coat after a day or 2 and I experienced no lifting or chipping whatsoever. Removal is as easy as application with no polish remover needed by just pulling them off your nails! I am definitely taking these with me on my next holiday to minimise nail products I need to haul with me. The only downside to the NCLA nail wraps is that they are on the pricey side at $18US for only 1 or 2 manis but they are super convenient and you can stretch the manis out by using them as accent nails. NCLA are releasing new Hello Kitty Xmas wraps and you bet I'll be purchasing them too!
Details: The NCLA x Hello Kitty nail wraps are available from the NCLA online store for $18US.
Thanks for looking as always!
What they say:
Being the nail
The nail wrap sets include 26 ultra thin self adhesive nail wraps, an adorable NCLA Hello Kitty nail file and easy to follow instructions on the back of the packaging.
The wraps are super simple to apply in just a few quick steps - check out this video by the awesome Steph Stone on how to apply the wraps. First you clean your nails using acetone or polish remover; apply base coat; choose the correct wraps for your nails and apply by stretching until they fit perfectly and flatten firmly; file any excess using the nail file and then finish off with topcoat. I found the wraps really thin and flexible so they molded easily to the nail and made them easy to manipulate. It also only takes very gentle pressure to file the excess nail wrap off which means less stress to the natural nail which is always a plus!
I used the bow nail wrap as an accent nail for this mani and I paired it with OPI Big Apple Red and it took me literally only 10mins from start to finish before I had to rush out the door for dinner. Too easy!
Overall: I've never been a massive fan of nail wraps but these NCLA have me addicted. It also helps that these are Hello Kitty designs of course! I love that the nail wraps are super thin so they molded easily to my nails - other nail wraps I've tried feel really bulky on the nail which I find so annoying and end up picking them off straight away. You've got plenty of time to stretch and manipulate the wraps on the nail to get the perfect fit and there's a good range of sizes to fit most nail shapes. The sizes are geared more towards ladies with larger nail beds like moi so ladies with smaller nail beds might have to cut them down to size.
I haven't been changing my polish as regularly these days so I wore this mani for a good 5-6 days before I got sick of it and the wraps were still going strong. I applied a coat of top coat after a day or 2 and I experienced no lifting or chipping whatsoever. Removal is as easy as application with no polish remover needed by just pulling them off your nails! I am definitely taking these with me on my next holiday to minimise nail products I need to haul with me. The only downside to the NCLA nail wraps is that they are on the pricey side at $18US for only 1 or 2 manis but they are super convenient and you can stretch the manis out by using them as accent nails. NCLA are releasing new Hello Kitty Xmas wraps and you bet I'll be purchasing them too!
Details: The NCLA x Hello Kitty nail wraps are available from the NCLA online store for $18US.
Thanks for looking as always!
Belated 4th blogiversary giveaway: Favourites giveaway!
GIVEAWAY NOW CLOSED!
Thank you for entering!
The last week of my belated 4th blogiversary giveaways is late unfortunately as I've been unwell but better late than never!! This week has been absolutely crazy at work which hasn't left much time for anything and as usual I'm so unorganised haha. This last giveaway is a little random but it consists of some of my favourite products!!
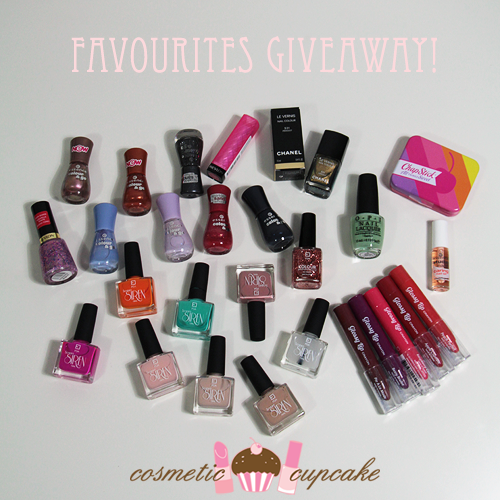
One lucky person will win:
OPI Damone Roberts 1968
Face of Australia Screen Siren collection
Face of Australia Glossy Lip Crayon collection - Apple crumble, Raspberry Coulis, Berry Brulee, Peach Parfait and Pie A La Mode
essence color & go polishes - hello marshmallow!, here's my number, crazy fancy love, me & my lover, date in the moonlight, misty rusty and absolutely blue and essence studio caring nail oil
Chapstick All Things Sweet lipkit
Revlon Colorburst Lip Butter in Sorbet
Revlon Girly
A huge thank you to Face of Australia for providing the Screen Siren and lip crayon collections for the giveaway!
How to enter:
- simply enter via the Rafflecopter widget thingy below!
Ts & Cs apply:
- open internationally
- must be 18 years and over to enter
- ends 24th August 2014
- winner must respond to notification email within 48 hours
GOOD LUCK!
Pretty please with a cherry on top manicure
When I'm in a nail art rut Japanese nail magazines always give me that nail boost I need. I haven't bought many nail mags this year actually so I made a trip to Kinokuniya last week to stock up on some mags. Kino has cut back on the number of nail mags they stock which is so disappointing - they didn't even have Nail Up! which is one of my favourites! I still managed to pick up 3 though phew.

I saw this adorable cherry mani in S Cawaii! (which I've never bought before actually) and knew I had to recreate it. I love doing bright summery manis during winter and this is super cute and fun!! Plus it's a fruit mani and you know I adore those! ♥

What I used:

Pinky and index: I used 2 coats of Barry M Gelly nail effects Grapefruit and added a small gold bead to the bottom centre of my nails.
Ring fingers: I used 3 coats of OPI GoldenEye.
Middle and thumbs: I used 2 coats of Essie Where's My Chauffeur? as my base. To create the cherries I used a dotting dipped in Barry M Gelly nail effect Grapefruit and a small brush to paint the stems using Ulta 3 chocolate cake and for the leaves I used Barry M nail paint Mint Green before adding detail to the cherries using Cult Nails Tempest.
I should have chosen a brighter green because you can't really see the leaves unfortunately but oh well!

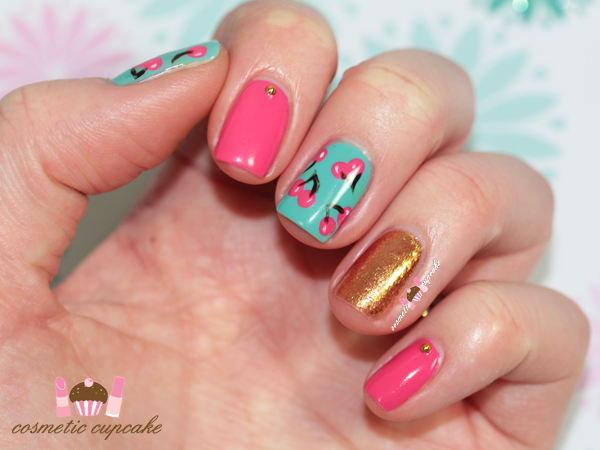
My NOTDs will be a bit varied at the moment because I've resorted to using flash because I just can't take pics during the day. The hubby bought me a lightbox a little while ago but I haven't worked out my lighting for it yet. Hurry up and come back summer with your beautiful long days and bright light!
What do you think? Did I do the original mani justice? Thanks for looking as always!
I saw this adorable cherry mani in S Cawaii! (which I've never bought before actually) and knew I had to recreate it. I love doing bright summery manis during winter and this is super cute and fun!! Plus it's a fruit mani and you know I adore those! ♥
What I used:
Pinky and index: I used 2 coats of Barry M Gelly nail effects Grapefruit and added a small gold bead to the bottom centre of my nails.
Ring fingers: I used 3 coats of OPI GoldenEye.
Middle and thumbs: I used 2 coats of Essie Where's My Chauffeur? as my base. To create the cherries I used a dotting dipped in Barry M Gelly nail effect Grapefruit and a small brush to paint the stems using Ulta 3 chocolate cake and for the leaves I used Barry M nail paint Mint Green before adding detail to the cherries using Cult Nails Tempest.
I should have chosen a brighter green because you can't really see the leaves unfortunately but oh well!
My NOTDs will be a bit varied at the moment because I've resorted to using flash because I just can't take pics during the day. The hubby bought me a lightbox a little while ago but I haven't worked out my lighting for it yet. Hurry up and come back summer with your beautiful long days and bright light!
What do you think? Did I do the original mani justice? Thanks for looking as always!
OPI Damone Roberts 1968
OPI Damone Roberts 1968 is a shade I've wanted to own ever since I first started blogging. The limited edition polish was created in collaboration with US eyebrow king Damone Roberts and is one of the prettiest green polishes I've seen. Back then I wasn't as crazy about polish so I never got around to getting it as I couldn't justify the price + shipping. I even did a post to see if anyone wanted to do a group order to split the costs but no takers sadly. But when I found out he was re-releasing the polish this year for the last time I HAD to own it even though it was double the price it was in 2009. I didn't care!

What they say:
OPI's "Damone Roberts 1968" Nail Polish was created by OPI in 2009 to celebrate the brand...Damone Roberts. The color was matched directly from our Beverly Hills & New York Salon walls in an effort to bring the unique pistachio tone, described by Damone himself as "a different green with undertones of a soft grey, and a warm brown that works well on every skin tone".
The masses seem to agree, as the color has sold out worldwide twice now. This polish is quite the hot commodity and bottles presently can be found on Ebay retailing for $75.00 each. We are proud to announce that OPI & Damone have teamed up for the third time to bring you a limited collector item quantity available Summer 2014.

Source
Damone Roberts 1968 is a soft mint green and having finally worn it myself now I know why it's such a sought after shade and I am totally and utterly in love with it. For starters the formula is ABSOLUTE perfection. Oh man I'm talking glides-on-so-smoothly-I-could-cry kind of buttery perfection. The shade has a gorgeous softness to it that I love and I think it would work well with most skintones. It dries quickly and to a high gloss shine. 2 beautifully even coats is pictured below.

Close up:


Overall: OPI Damone Roberts 1968 definitely lives up to the hype and I love love LOVE this mint green. I can't believe I didn't purchase it years ago! It's pretty pricey though but I'm a sucker for limited edition shades so it was worth the wait and price for me. I'm just so happy I finally own a bottle! I also picked up a few back up bottles too x)
Details: Available from Damoneroberts.com and Damone Roberts salons in the US for $20US.
Is there a polish you've wanted for years that you've finally had the chance to own? There are so many more on my list but baby steps to tick off the wishlist! Don't forget to enter my 4th blogivesary China Glaze Surprise collection giveaway!
Thanks for looking as always!
What they say:
The masses seem to agree, as the color has sold out worldwide twice now. This polish is quite the hot commodity and bottles presently can be found on Ebay retailing for $75.00 each. We are proud to announce that OPI & Damone have teamed up for the third time to bring you a limited collector item quantity available Summer 2014.
Damone Roberts 1968 is a soft mint green and having finally worn it myself now I know why it's such a sought after shade and I am totally and utterly in love with it. For starters the formula is ABSOLUTE perfection. Oh man I'm talking glides-on-so-smoothly-I-could-cry kind of buttery perfection. The shade has a gorgeous softness to it that I love and I think it would work well with most skintones. It dries quickly and to a high gloss shine. 2 beautifully even coats is pictured below.
Close up:
Overall: OPI Damone Roberts 1968 definitely lives up to the hype and I love love LOVE this mint green. I can't believe I didn't purchase it years ago! It's pretty pricey though but I'm a sucker for limited edition shades so it was worth the wait and price for me. I'm just so happy I finally own a bottle! I also picked up a few back up bottles too x)
Details: Available from Damoneroberts.com and Damone Roberts salons in the US for $20US.
Is there a polish you've wanted for years that you've finally had the chance to own? There are so many more on my list but baby steps to tick off the wishlist! Don't forget to enter my 4th blogivesary China Glaze Surprise collection giveaway!
Thanks for looking as always!
Drippy ice cream nails
My eczema and contact dermatitis have been playing up so badly this winter that I've had to sport naked nails most of the time since coming home from warm Europe and HK unfortunately. But naked nails make for a sad 'chelle so I had to brave some nail art! I've been following a heap of celeb nail artists on Instagram and one of my faves is Steph Stone Nails and I couldn't go past her adorable summer drippy ice cream nails. I absolutely LOVE drippy nails and I've done them quite a few times but it was time for a proper ice cream looking mani! I followed her tutorial to create them but my version doesn't look anywhere near as polished obviously. Please excuse my terribly haggard looking hands and cuticles!

I started off with 2 coats of Kester Black Butter Cream* as my base for all nails except my accent nails where I used 3 coats of Etude House Dear My Party Nails PPK001 and added criss cross lines using Hello Darling Say No To Cameltoe using a striper brush. For the ice cream drips I decided to go colourful and I used Kester Black Fairy Floss* for my pinky, Hello Darling Ganache for my middle fingers and Cult Nails Tempest for my index fingers.

For my thumbs I used Hello Darling Mint Slice* for the ice cream drip and I used a large dotting tool and OPI Big Apple Red* to create the cherries. For the sprinkles I used China Glaze Tart-y for the Party, Keep Calm, Paint On and Life is Rosy and Models Own nail art pens in yellow and blue.


I love a bit of summer during winter and who doesn't enjoy ice cream in the cooler months?!! What do you think? Thanks for looking as always!
* Product(s) provided to me for consideration but this in no way influenced my review in any way. As always, my reviews are my 100% honest opinion. My Disclosure Policy can be viewed here.
I started off with 2 coats of Kester Black Butter Cream* as my base for all nails except my accent nails where I used 3 coats of Etude House Dear My Party Nails PPK001 and added criss cross lines using Hello Darling Say No To Cameltoe using a striper brush. For the ice cream drips I decided to go colourful and I used Kester Black Fairy Floss* for my pinky, Hello Darling Ganache for my middle fingers and Cult Nails Tempest for my index fingers.
For my thumbs I used Hello Darling Mint Slice* for the ice cream drip and I used a large dotting tool and OPI Big Apple Red* to create the cherries. For the sprinkles I used China Glaze Tart-y for the Party, Keep Calm, Paint On and Life is Rosy and Models Own nail art pens in yellow and blue.
I love a bit of summer during winter and who doesn't enjoy ice cream in the cooler months?!! What do you think? Thanks for looking as always!
* Product(s) provided to me for consideration but this in no way influenced my review in any way. As always, my reviews are my 100% honest opinion. My Disclosure Policy can be viewed here.
Gwen Stefani for OPI collection swatches and review
Happy Monday everyone!! I hope you all had a fab weekend =) Today I have swatches and review of the Gwen Stefani for OPI collection which was released recently. Gwen has been a fashion and beauty icon for years so it was about time she collaborated on a nail line! WARNING: This post is PIC HEAVY.

What they say:
"OPI joins celebrity partner Gwen Stefani in announcing seven new limited edition nail lacquers for 2014, featuring standout color in breakthrough finishes. Highlights from the collection include a bold red lacquer that pays homage to Gwen’s signature lipstick, a new semi-matte satin finish in shades of gold and black, and a mirrored chrome paired with a special base coat.
Inspired by the 2013 Metropolitan Museum Costume Institute Gala that featured the theme “PUNK: CHAOS TO COUTURE,” OPI Executive VP and Artistic Director Suzi Weiss-Fischmann decided to create a collection of lacquer celebrating the role of music as a major influence in fashion."

What they say:
Inspired by the 2013 Metropolitan Museum Costume Institute Gala that featured the theme “PUNK: CHAOS TO COUTURE,” OPI Executive VP and Artistic Director Suzi Weiss-Fischmann decided to create a collection of lacquer celebrating the role of music as a major influence in fashion."
My Hong Kong November 2013 haul!
Happy Friday ladies!! I've been back at work for only 5 days and I feel like I need another holiday already haha! I've definitely got the post holiday blues but at least it's Christmas soon so there's public holidays (and presents!) to enjoy =D Today I have my haul from my latest trip to Hong Kong for you!!! I didn't actually buy much in comparison to my other trips which is a good thing for my wallet haha xp The exchange rate wasn't so great and I'm saving for a few things so I used a LOT of restraint! I did more eating to make up for it lol.

As soon as I saw the Deborah Lippmann Space Oddity set on her Instagram I knew I had to have it!!! They aren't your typical holiday shades but they look absolutely gorgeous by themselves and together too. I also picked up the Stronger which is the collaboration shade with Kelly Clarkson - it's been on my wishlist for months and I finally picked it up squeeeeeeeeee! I love Kelly Clarkson!

I let myself get talked into buying the OPI Mariah Carey Pure 18K White Gold & Silver Top Coat xp I missed out on The Man With the Golden Gun last year so couldn't miss out this year!

I hauled a few things from Etude House for myself and for pressies! I love their stuff because it's just so sweet - pink everything! I got some polishes and a foot mask for myself and scored the little tin as a freebie.

My niece had her birthday party while I was in HK and my sis in-law asked me to do a little nail bar for the girls. Of course I said yes and it was so much fun! I didn't bring any of my tools so I bought the Lucky Trendy Dot Artist set to use but didn't end up needing to use it so I'm keeping it for myself haha. The purple is really pretty! I came across a Korean brand called Ally's Ajell and they had dual nail art pens so I picked up one in white to try out. I also bought 2 gorgeous glitters from Tony Moly!

I adore Anna Sui and I couldn't resist this limited edition Nail Care Oil!!! Isn't it just gorgeous? You shake it up and then apply and works wonderfully.

I stocked up on my favourite Zoya Remove and also picked up my first Pixie Dust in Stevie. I wish I had got a few other shades too because I am loving Pixie Dust! They wear so well and the shades are so pretty.

I picked up one of the new Canmake creme blushes in 04 and also restocked my HG Dolly Wink mascara which came with a bonus eyeliner woot!

Bioderma is my HG makeup remover and so I had to pick up this new bottle with pump dispenser. You should have seen how excited I was then I saw it haha!

Some lovely gifts from Jen who blogs over at Life and Lens of Beauty! I met up with her as usual and did some shopping =D Thank you Jen and I can't wait to go shopping with you next year!! (Thanks for letting me use your Joyce Beauty member discount btw!!)

I picked up the new Roses de Chloe on an impulse but I haven't opened it yet because I'm not sure I'm going to keep it! I love the smell of it but I have so many perfumes already I'm not sure I really need another one.. I might end up gifting it to my sis but we'll see.

Some Forever 21 accessories! I love their accessories and always try to pick up a few each trip. Their accessories department takes up like an entire floor and it is always SO DAMN HARD deciding what to buy when on a budget!

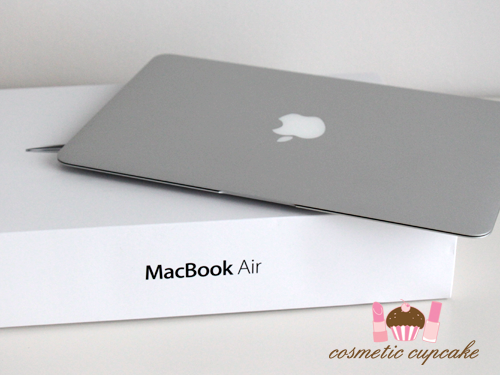
My biggest splurge on my trip was a new 11" MacBook Air!! My beloved Air died a few months ago so I took advantage of duty free and bought a replacement. The 11" is the perfect size I think!
I hope you enjoyed seeing my Hong Kong haul! Thanks for looking as always and don't forget to enter my Face of Australia Carnivale giveaway!
As soon as I saw the Deborah Lippmann Space Oddity set on her Instagram I knew I had to have it!!! They aren't your typical holiday shades but they look absolutely gorgeous by themselves and together too. I also picked up the Stronger which is the collaboration shade with Kelly Clarkson - it's been on my wishlist for months and I finally picked it up squeeeeeeeeee! I love Kelly Clarkson!
I let myself get talked into buying the OPI Mariah Carey Pure 18K White Gold & Silver Top Coat xp I missed out on The Man With the Golden Gun last year so couldn't miss out this year!
I hauled a few things from Etude House for myself and for pressies! I love their stuff because it's just so sweet - pink everything! I got some polishes and a foot mask for myself and scored the little tin as a freebie.
My niece had her birthday party while I was in HK and my sis in-law asked me to do a little nail bar for the girls. Of course I said yes and it was so much fun! I didn't bring any of my tools so I bought the Lucky Trendy Dot Artist set to use but didn't end up needing to use it so I'm keeping it for myself haha. The purple is really pretty! I came across a Korean brand called Ally's Ajell and they had dual nail art pens so I picked up one in white to try out. I also bought 2 gorgeous glitters from Tony Moly!
I adore Anna Sui and I couldn't resist this limited edition Nail Care Oil!!! Isn't it just gorgeous? You shake it up and then apply and works wonderfully.
I stocked up on my favourite Zoya Remove and also picked up my first Pixie Dust in Stevie. I wish I had got a few other shades too because I am loving Pixie Dust! They wear so well and the shades are so pretty.
I picked up one of the new Canmake creme blushes in 04 and also restocked my HG Dolly Wink mascara which came with a bonus eyeliner woot!
Bioderma is my HG makeup remover and so I had to pick up this new bottle with pump dispenser. You should have seen how excited I was then I saw it haha!
Some lovely gifts from Jen who blogs over at Life and Lens of Beauty! I met up with her as usual and did some shopping =D Thank you Jen and I can't wait to go shopping with you next year!! (Thanks for letting me use your Joyce Beauty member discount btw!!)
I picked up the new Roses de Chloe on an impulse but I haven't opened it yet because I'm not sure I'm going to keep it! I love the smell of it but I have so many perfumes already I'm not sure I really need another one.. I might end up gifting it to my sis but we'll see.
Some Forever 21 accessories! I love their accessories and always try to pick up a few each trip. Their accessories department takes up like an entire floor and it is always SO DAMN HARD deciding what to buy when on a budget!
My biggest splurge on my trip was a new 11" MacBook Air!! My beloved Air died a few months ago so I took advantage of duty free and bought a replacement. The 11" is the perfect size I think!
I hope you enjoyed seeing my Hong Kong haul! Thanks for looking as always and don't forget to enter my Face of Australia Carnivale giveaway!
Halloween drip manicure
I've been so uninspired lately. October is usually a great month because there's pink and Halloween manis to do but I haven't been in the mood to try out anything doh. I did manage to do a quick Halloween drip mani the other day though which I always love doing and always work!!

For my pinky I used 2 coats of Rescue Beauty Lounge Concrete Jungle and dripped essence You've Got the Art; for my ring finger I used 1 coat of Kester Black Cherry Pie* and Cult Nails Nevermore for the drips; for my middle finger I used 2 coats of China Glaze Roguish Red and China Glaze Happy Go Lucky for the drips and for my index finger I used 2 coats of Sinful Colors Mint Apple and China Glaze Grape Pop for the drips.

For my thumb I used 2 coats of OPI Alpine Snow and Kester Black Cherry Pie* for the drips. I think my fave colour combo is my pinky as it looks like slime!


What do you do when you're uninspired? I hate being in a rut and it seems to always happen!
For my pinky I used 2 coats of Rescue Beauty Lounge Concrete Jungle and dripped essence You've Got the Art; for my ring finger I used 1 coat of Kester Black Cherry Pie* and Cult Nails Nevermore for the drips; for my middle finger I used 2 coats of China Glaze Roguish Red and China Glaze Happy Go Lucky for the drips and for my index finger I used 2 coats of Sinful Colors Mint Apple and China Glaze Grape Pop for the drips.
For my thumb I used 2 coats of OPI Alpine Snow and Kester Black Cherry Pie* for the drips. I think my fave colour combo is my pinky as it looks like slime!
What do you do when you're uninspired? I hate being in a rut and it seems to always happen!
* Product(s) provided to me for consideration but this in no way influenced my review in any way. As always, my reviews are my 100% honest opinion. My Disclosure Policy can be viewed here.
Subscribe to:
Posts (Atom)




