OPI Big Apple Red
Today I have an oldie but a goodie shade for you all! Every girl needs at least one red creme in their stash and sometimes it's hard to choose the right one since there are about a million and one different reds out there. I tend to go for blue based reds but OPI Big Apple Red is a classic red and one that I reach for quite often these days. It's a gorgeous orange based red and is perfectly opaque in 2 even coats and dries to a high gloss finish.
is a gorgeous orange based red that I reach for quite often these days.


Details: Available from the usual OPI stockists for $19.95
Whats your favourite red polish? My long time favourite red is Rimmel's Double Decker Red (you can see a super old swatch of it here) but I have a really old bottle and they have a new formula now I think which is slightly different to the original.
Thanks for looking as always!
The product featured in this post were provided to me for consideration but this in no way influenced my review in any way. As always, my reviews are my 100% honest opinion. My Disclosure Policy can be viewed here.
is a gorgeous orange based red that I reach for quite often these days.
Details: Available from the usual OPI stockists for $19.95
Whats your favourite red polish? My long time favourite red is Rimmel's Double Decker Red (you can see a super old swatch of it here) but I have a really old bottle and they have a new formula now I think which is slightly different to the original.
Thanks for looking as always!
The product featured in this post were provided to me for consideration but this in no way influenced my review in any way. As always, my reviews are my 100% honest opinion. My Disclosure Policy can be viewed here.
Beach manicure
It is swelteringly hot here in Sydney at the moment and it's not even summer yet. Our place doesn't have air conditioning so I've been hiding out with all the blinds closed when not at work haha. With that in mind I thought it was time for a summery mani to go with the weather and what better way than with a beach manicure! It was a bit of a fail though because my top coat bubbled but I guess it unintentionally adds to the beach and sea theme so let's just say I did it intentionally ok!

I started off with 2 coats of Kester Black Blueberry Tart* (you can see my swatch of it here) as my base and then sponged OPI Glitzerland to the base of each nail for the sand. I then stamped wave design from Bundle Monster BM-509 using Konad Special polish in white and added a coat of China Glaze Snow Globe. To finish it off I added a gold shell stud and some different sized pearls.


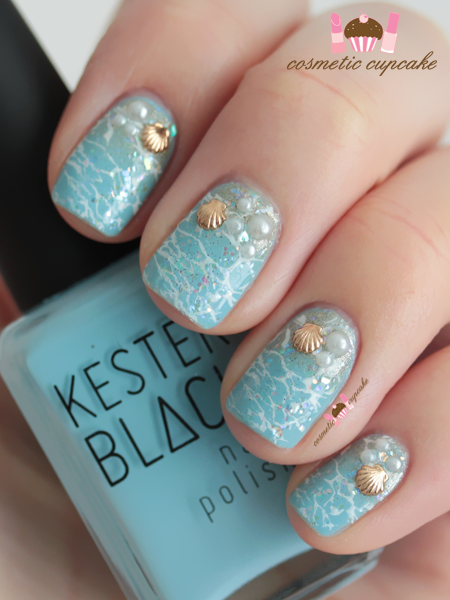
What do you think of my beach mani? Hope you're all having a fab weekend and for the Aussie girls that you stay cool! Thanks for looking as always!
* Product(s) provided to me for consideration but this in no way influenced my review in any way. As always, my reviews are my 100% honest opinion. My Disclosure Policy can be viewed here.
I started off with 2 coats of Kester Black Blueberry Tart* (you can see my swatch of it here) as my base and then sponged OPI Glitzerland to the base of each nail for the sand. I then stamped wave design from Bundle Monster BM-509 using Konad Special polish in white and added a coat of China Glaze Snow Globe. To finish it off I added a gold shell stud and some different sized pearls.
What do you think of my beach mani? Hope you're all having a fab weekend and for the Aussie girls that you stay cool! Thanks for looking as always!
* Product(s) provided to me for consideration but this in no way influenced my review in any way. As always, my reviews are my 100% honest opinion. My Disclosure Policy can be viewed here.
Dinner by Heston Blumenthal, London
Happy Thursday guys! I hope you've all had a good week so far. It's been a busy week but on Monday I got the jaw dropping news that I had won a very coveted reservation at The Fat Duck Melbourne for next year. And a CHEFS TABLE to top it off OMG!!!!! I'm literally beside myself with excitement even though there's still 6 months to go. So I thought it was about time I caught up with posts and shared some pics from lunch at Dinner by Heston Blumenthal in London from earlier this year. The husband and I treated ourselves to a splurge meal in each country we went to on our honeymoon and being the huge Heston Blumenthal fan I am Dinner was a must do! I would have loved to go to The Fat Duck but sadly we didn't have enough time to venture to Berkshire but luckily it's coming to us now woohoo!

Dinner by Heston Blumenthal is located at the Mandarin Oriental in Hyde Park and is a 2 Michelin Star restaurant. We would have loved to stay at the Mandarin Oriental but sadly our budget didn't stretch that far haha. It's such a beautiful hotel and in such a great location too with Harvey Nichols and Harrods only a stones throw away.

Dinner by Heston Blumenthal is located at the Mandarin Oriental in Hyde Park and is a 2 Michelin Star restaurant. We would have loved to stay at the Mandarin Oriental but sadly our budget didn't stretch that far haha. It's such a beautiful hotel and in such a great location too with Harvey Nichols and Harrods only a stones throw away.
NCLA x Hello Kitty Bows nail wraps
I may be nearing 30 (EEK) but my love of the super cute Hello Kitty still continues. It's her 40th anniversary this year so to celebrate NCLA devoted their latest nail wrap collection to everyone's favourite kitty. The range consists of 8 nail wraps featuring bright neon, bows and floral designs. There's a design to suit every Hello Kitty lover!

What they say:
"Do your nails instantly! No heat lamp, no drying time and no waiting required! All you need is clear polish. Try it, and you'll have a well-designed and polished look to complement any outfit in no time. ;) Channel your inner Hello Kitty with this bow-bedecked design that nods at her fab trademark accessory."

Being the nailhoarder collector I am I wanted all the designs but I was good and only purchased the floral and bows designs! Seriously SO DAMN CUTE.

The nail wrap sets include 26 ultra thin self adhesive nail wraps, an adorable NCLA Hello Kitty nail file and easy to follow instructions on the back of the packaging.

The wraps are super simple to apply in just a few quick steps - check out this video by the awesome Steph Stone on how to apply the wraps. First you clean your nails using acetone or polish remover; apply base coat; choose the correct wraps for your nails and apply by stretching until they fit perfectly and flatten firmly; file any excess using the nail file and then finish off with topcoat. I found the wraps really thin and flexible so they molded easily to the nail and made them easy to manipulate. It also only takes very gentle pressure to file the excess nail wrap off which means less stress to the natural nail which is always a plus!


I used the bow nail wrap as an accent nail for this mani and I paired it with OPI Big Apple Red and it took me literally only 10mins from start to finish before I had to rush out the door for dinner. Too easy!


Overall: I've never been a massive fan of nail wraps but these NCLA have me addicted. It also helps that these are Hello Kitty designs of course! I love that the nail wraps are super thin so they molded easily to my nails - other nail wraps I've tried feel really bulky on the nail which I find so annoying and end up picking them off straight away. You've got plenty of time to stretch and manipulate the wraps on the nail to get the perfect fit and there's a good range of sizes to fit most nail shapes. The sizes are geared more towards ladies with larger nail beds like moi so ladies with smaller nail beds might have to cut them down to size.
I haven't been changing my polish as regularly these days so I wore this mani for a good 5-6 days before I got sick of it and the wraps were still going strong. I applied a coat of top coat after a day or 2 and I experienced no lifting or chipping whatsoever. Removal is as easy as application with no polish remover needed by just pulling them off your nails! I am definitely taking these with me on my next holiday to minimise nail products I need to haul with me. The only downside to the NCLA nail wraps is that they are on the pricey side at $18US for only 1 or 2 manis but they are super convenient and you can stretch the manis out by using them as accent nails. NCLA are releasing new Hello Kitty Xmas wraps and you bet I'll be purchasing them too!
Details: The NCLA x Hello Kitty nail wraps are available from the NCLA online store for $18US.
Thanks for looking as always!
What they say:
Being the nail
The nail wrap sets include 26 ultra thin self adhesive nail wraps, an adorable NCLA Hello Kitty nail file and easy to follow instructions on the back of the packaging.
The wraps are super simple to apply in just a few quick steps - check out this video by the awesome Steph Stone on how to apply the wraps. First you clean your nails using acetone or polish remover; apply base coat; choose the correct wraps for your nails and apply by stretching until they fit perfectly and flatten firmly; file any excess using the nail file and then finish off with topcoat. I found the wraps really thin and flexible so they molded easily to the nail and made them easy to manipulate. It also only takes very gentle pressure to file the excess nail wrap off which means less stress to the natural nail which is always a plus!
I used the bow nail wrap as an accent nail for this mani and I paired it with OPI Big Apple Red and it took me literally only 10mins from start to finish before I had to rush out the door for dinner. Too easy!
Overall: I've never been a massive fan of nail wraps but these NCLA have me addicted. It also helps that these are Hello Kitty designs of course! I love that the nail wraps are super thin so they molded easily to my nails - other nail wraps I've tried feel really bulky on the nail which I find so annoying and end up picking them off straight away. You've got plenty of time to stretch and manipulate the wraps on the nail to get the perfect fit and there's a good range of sizes to fit most nail shapes. The sizes are geared more towards ladies with larger nail beds like moi so ladies with smaller nail beds might have to cut them down to size.
I haven't been changing my polish as regularly these days so I wore this mani for a good 5-6 days before I got sick of it and the wraps were still going strong. I applied a coat of top coat after a day or 2 and I experienced no lifting or chipping whatsoever. Removal is as easy as application with no polish remover needed by just pulling them off your nails! I am definitely taking these with me on my next holiday to minimise nail products I need to haul with me. The only downside to the NCLA nail wraps is that they are on the pricey side at $18US for only 1 or 2 manis but they are super convenient and you can stretch the manis out by using them as accent nails. NCLA are releasing new Hello Kitty Xmas wraps and you bet I'll be purchasing them too!
Details: The NCLA x Hello Kitty nail wraps are available from the NCLA online store for $18US.
Thanks for looking as always!
Subscribe to:
Posts (Atom)


