Kester Black Summer 2014/15 collection swatches and review
If you've been following me for a while you'll know that I absolutely adore Kester Black lacquers. It's one of my favourite Aussie brands and I've featured the shades in quite a few of my posts! In August they released 4 new shades for Summer 2014/15 so of course I added them all to my collection. I also picked up some other new shades which I'll share swatches of later.
It's taken me FOREVER to get these swatched but hey life gets in the way unfortunately. These fun bright shades are 5 free as always (meaning no nasty Toluene, DBP, Formaldehyde, Formeheldyde Resin and Camphor), carcinogen free and are Australian made and owned and accredited Cruelty-Free.

What they say:
"The new collection is bold and eclectic, failing to represent any singular idea. For this reason the range will be left untitled, left to the interpretation of our audience. From neon yellow and fuschia purple to soft peach and pale blue, this range is designed to offer something for every mood and desire the warmer months might bring."

It's taken me FOREVER to get these swatched but hey life gets in the way unfortunately. These fun bright shades are 5 free as always (meaning no nasty Toluene, DBP, Formaldehyde, Formeheldyde Resin and Camphor), carcinogen free and are Australian made and owned and accredited Cruelty-Free.
What they say:
What's In-die Box? December 2014 Aussie Christmas
Hellooooooooo everyone! Hope you all had a fab Christmas! What did you all get up to? I had a super quiet one this year. The hubby and I spent time with our families and then all we've done since then is mainly eat! Sooooo bad. I've had a few days off work so I took the chance to catch up on some blogging. Today I have swatches from the December 2014 Aussie Christmas What's In-die Box? featuring Glam Polish, Glittering Elements, Lilypad Lacquer, Peita's Polish and McKfresh Nail Attire lacquers. I was sent last years What's In-die Box Christmas box and I really enjoyed it so I thought I'd treat myself to this years December box. I haven't hauled polish in a while so I was excited for the box to arrive!

If you haven't heard of What's In-die Box?, it's a monthly nail polish box that contains 5 exclusive Aussie indie shades with a different theme for each month. The inspiration for this months box was an Aussie Christmas and I think the box pretty accurately reflects the theme!

Source
To see the shades in the December box keep reading after the jump!
If you haven't heard of What's In-die Box?, it's a monthly nail polish box that contains 5 exclusive Aussie indie shades with a different theme for each month. The inspiration for this months box was an Aussie Christmas and I think the box pretty accurately reflects the theme!
To see the shades in the December box keep reading after the jump!
Honeymoon part 3 - Venice Simplon-Orient-Express London to Paris
Continuing on from part 1 and part 2 of my honeymoon series!
After taking the Venice Simplon-Orient-Express (VSOE) British Pullman from London Victoria Station, we then arrived at Folkestone West where we were welcomed by a lovely band before boarding luxury coaches to cross the English channel. This was the slightly underwhelming part as there wasn't much to see however the coaches were extremely comfy and had tables and drinks service! We met a very lovely English couple who were well travelled and they gave us fantastic tips for Paris and Rome so it was lovely chatting to them on the coach.

We reached Calais station at about 4:30pm where we met by the breathtaking VSOE. Seeing the iconic dark blue train restored to it's finest was an absolutely surreal moment for me. Having travelled halfway across the world to travel on it was a sight to behold and I was beside myself with excitement.

After taking the Venice Simplon-Orient-Express (VSOE) British Pullman from London Victoria Station, we then arrived at Folkestone West where we were welcomed by a lovely band before boarding luxury coaches to cross the English channel. This was the slightly underwhelming part as there wasn't much to see however the coaches were extremely comfy and had tables and drinks service! We met a very lovely English couple who were well travelled and they gave us fantastic tips for Paris and Rome so it was lovely chatting to them on the coach.
We reached Calais station at about 4:30pm where we met by the breathtaking VSOE. Seeing the iconic dark blue train restored to it's finest was an absolutely surreal moment for me. Having travelled halfway across the world to travel on it was a sight to behold and I was beside myself with excitement.
Honeymoon part 2 - Venice Simplon-Orient-Express Belmond British Pullman: London to Paris
Following on from part 1 of my honeymoon series!
Traveling on the Venice Simplon-Orient-Express (VSOE) is something I've wanted to do since I was a child. An old English teacher introduced the class to Agatha Christie with "Murder in Mesopotamia" and since then I've been hooked on the workings of the little grey cells of the great Belgian detective Hercule Poirot. We were tossing up where to go for our honeymoon and first choice (for me anyway!) was Maldives but for the price of one week there we could do 3 weeks in Europe so it was Europe for us!
Now that we had decided, it was time to decide which cities we would visit and whether or not we would take the Orient Express. Its not the most economical way to travel by any means and would eat into our budget quite a bit. My hubby very kindly insisted we do the trip and so we planned our honeymoon around it and boy am I glad we took the journey. Today I want to share with you part 1 of the amazing train journey - if this isn't your thing then don't worry check back later! Warning: this post is PICTURE HEAVY.

The Orient Express embarks on many journeys including within the UK to the more traditional Paris to Istanbul while Poirot travelled from Istanbul to London. We decided to take the London to Paris leg and then going onto Rome after that. We booked our tickets in December which began the countdown to our trip of a lifetime! About a week before we set off on our honeymoon, our travel journal arrived which contained all our information for the journey including details about the trains, passport and visa information, dress code, cabin information and information about travel destinations.

A copy of my very battered old copy of Murder on the Orient Express and our travel journal and luggage tags
The morning of our journey started off early with packing, checking out of our hotel and heading to busy London Victoria station to check in at the special Orient Express counter for our journey. Me being very anxious not to be late we got there at 9am and were one of the first to check in!

Traveling on the Venice Simplon-Orient-Express (VSOE) is something I've wanted to do since I was a child. An old English teacher introduced the class to Agatha Christie with "Murder in Mesopotamia" and since then I've been hooked on the workings of the little grey cells of the great Belgian detective Hercule Poirot. We were tossing up where to go for our honeymoon and first choice (for me anyway!) was Maldives but for the price of one week there we could do 3 weeks in Europe so it was Europe for us!
Now that we had decided, it was time to decide which cities we would visit and whether or not we would take the Orient Express. Its not the most economical way to travel by any means and would eat into our budget quite a bit. My hubby very kindly insisted we do the trip and so we planned our honeymoon around it and boy am I glad we took the journey. Today I want to share with you part 1 of the amazing train journey - if this isn't your thing then don't worry check back later! Warning: this post is PICTURE HEAVY.
The Orient Express embarks on many journeys including within the UK to the more traditional Paris to Istanbul while Poirot travelled from Istanbul to London. We decided to take the London to Paris leg and then going onto Rome after that. We booked our tickets in December which began the countdown to our trip of a lifetime! About a week before we set off on our honeymoon, our travel journal arrived which contained all our information for the journey including details about the trains, passport and visa information, dress code, cabin information and information about travel destinations.
The morning of our journey started off early with packing, checking out of our hotel and heading to busy London Victoria station to check in at the special Orient Express counter for our journey. Me being very anxious not to be late we got there at 9am and were one of the first to check in!
Essence Yes, we POP! trend edition swatches and review
I'm a bit late showing you the latest essence collection oops but better late than never I always say! The Yes, we POP! trend edition is all about nail art which is on trend and right up my alley.

What they say:
"Unique, trendy and full of effects: with the trend edition “yes, we POP!”, essence is offering versatile products for an effect-gel manicure with a true wow-factor in November and December 2014. Nail art is totally hip right now – especially with these nail pieces inspired by the modern, colorful and catchy world of pop art. There are so many ways to decorate your popular high-shine gel-finish in a creative way now! Bright colours, nail toppers, cool effects, funny symbols or nail foils – they are all just waiting to be applied on your gel nails.
The basic products are absolutely essential for an exciting gel manicure – and for a limited time they’re available with an innovative 2in1 formula. With the 2in1 primer & cleanser and the 2in1 peel off gel base & top coat, it’s even easier to create your perfect gel manicure, which lasts up to 10 days. Of course, all of the decorations in this trend edition can also be used without a gel manicure – for endless nail styles!"

What they say:
The basic products are absolutely essential for an exciting gel manicure – and for a limited time they’re available with an innovative 2in1 formula. With the 2in1 primer & cleanser and the 2in1 peel off gel base & top coat, it’s even easier to create your perfect gel manicure, which lasts up to 10 days. Of course, all of the decorations in this trend edition can also be used without a gel manicure – for endless nail styles!"
Snowflake Rudolph manicure

Another day another Christmas mani! This time with a little freehand nail art featuring everyone's favourite red nosed reindeer. For the snowflake nails I used 2 coats of one of my favourite blues Hello Darling Wading Pool (swatched here) and stamped full snowflake design from Moyou London Festive Collection plate 03 using Konad Special polish in white.
For the reindeers I used 2 coats of Cult Nails Tempest as my base and painted a semi circle for the reindeer head using Essie Hot Coco. I used China Glaze Ruby Pumps for the nose and Cult Nails Tempest for the eyes and Kiss nail art striper in black for the eyes, antlers and outline. Topped it all off with a coat of top coat!


Only a week and a bit left til Christmas eek! What are you wearing on your nails at the moment?
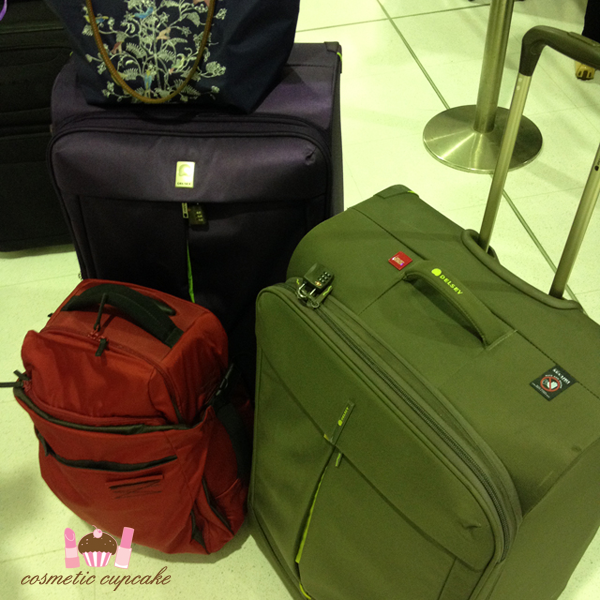
Honeymoon part 1 - London calling!
This post is super late but better late than never! A few months ago the hubby and I returned from our belated honeymoon to London, Paris, Rome and Hong Kong. We had the most AMAZING time and I really wish our trip could have been longer!! First stop was London which I have wanted to go to since I was a kid and it didn't disappoint one bit. This is going to be a long post so if you're not into travel check back another day ;)
Please note: THIS IS A PICTURE HEAVY POST.
Please note: THIS IS A PICTURE HEAVY POST.
Sambora Beach Toes Starfish, Sunday Session and Baby Wave swatches and review
Happy Monday ladies! Today I have swatches from a brand that I haven't tried before - Sambora Beach Toes. Sambora Beach Toes is an Aussie surf brand that specialises in UV stabilised nail lacquers that are pantone matched to go with the latest beach wear! The lacquers are 5 free (meaning no nasties like Toluene, Formaldehyde, Formaldehyde Resin, DBP, Camphor), not tested on animals and are Choose Cruelty Free accredited which is absolutely fantastic in my opinion. There are 48 shades in their collection which are so bright my camera pretty much freaked out when I swatched them. Keep reading to see my swatches and find out my thoughts on the lacquers!

I was sent 3 bright fun shades to try out - Starfish, Sunday Session and Baby Wave. I love me some good brights so I was excited to try them out when they arrived in the post. The polishes came boxed and packed neatly in a very handy plastic travel case/toiletry bag along with a floral nail file. I'm a sucker for travel cases and this one is the perfect size to hold your Sambora Beach Toes lacquers, top coat and nail tools when travelling.


Onto the swatches! Starfish is a bright coral neon that dries matte to an almost jelly like finish. My camera doesn't capture anywhere near how in your face bright this coral is and makes the perfect pedicure shade! 2 coats is pictured with 1 coat of top coat.
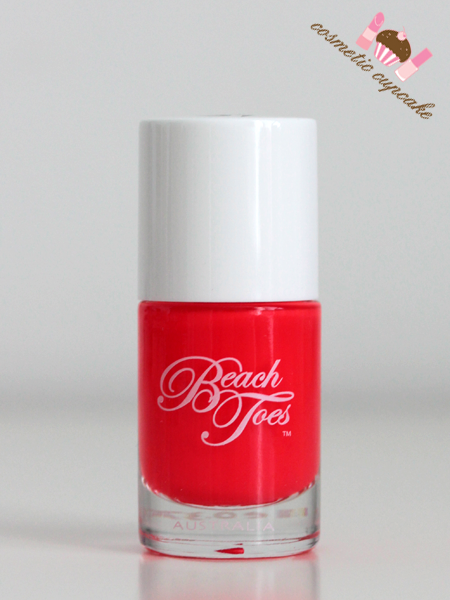


Sunday Session is a bright pink neon that also dries matte to an almost jelly like finish. I found dry time on this one a little long though so I added a coat of quick dry top coat to speed up the process. 3 coats is pictured with 1 coat of top coat.


Baby Wave is a baby blue pastel creme. A soft blue shade and it reminds me of one of the very first polishes I ever bought as a teen! I found the formula thicker than Starfish and Sunday Session so I would suggest thin coats. 2 coats is pictured with no top coat.


Overall: I really enjoyed the Sambora Beach Toes polishes I was sent and will definitely be rocking them this hot Summer season even though I don't go to the beach often! The shades are absolutely spot on for Summer and just scream sun, sand and surf. I found the brushes quite flexible which I'm not usually a fan of because it can be difficult to get a clean finish but it was no issue and I had very minimal clean up. I found dry time overall on the slow side compared with other brands however I think it may have been my application as Sambora tell me most people find dry time quite quick. I'll definitely have to test them out when not swatching. The lacquers are made in Australia which I love as I always prefer using and buying local made products. Definitely a brand to try especially if you enjoy the beach and with such a great selection of shades too!
Details: Sambora Beach Toes polishes are available from Sambora Beach Toes online store for $18.95 with free shipping on all purchases in Australia.

What do you think? Thanks for looking as always!
The products featured in this post were provided to me for consideration but this in no way influenced my review in any way. As always, my reviews are my 100% honest opinion. My Disclosure Policy can be viewed here.
I was sent 3 bright fun shades to try out - Starfish, Sunday Session and Baby Wave. I love me some good brights so I was excited to try them out when they arrived in the post. The polishes came boxed and packed neatly in a very handy plastic travel case/toiletry bag along with a floral nail file. I'm a sucker for travel cases and this one is the perfect size to hold your Sambora Beach Toes lacquers, top coat and nail tools when travelling.
Onto the swatches! Starfish is a bright coral neon that dries matte to an almost jelly like finish. My camera doesn't capture anywhere near how in your face bright this coral is and makes the perfect pedicure shade! 2 coats is pictured with 1 coat of top coat.
Sunday Session is a bright pink neon that also dries matte to an almost jelly like finish. I found dry time on this one a little long though so I added a coat of quick dry top coat to speed up the process. 3 coats is pictured with 1 coat of top coat.
Baby Wave is a baby blue pastel creme. A soft blue shade and it reminds me of one of the very first polishes I ever bought as a teen! I found the formula thicker than Starfish and Sunday Session so I would suggest thin coats. 2 coats is pictured with no top coat.
Overall: I really enjoyed the Sambora Beach Toes polishes I was sent and will definitely be rocking them this hot Summer season even though I don't go to the beach often! The shades are absolutely spot on for Summer and just scream sun, sand and surf. I found the brushes quite flexible which I'm not usually a fan of because it can be difficult to get a clean finish but it was no issue and I had very minimal clean up. I found dry time overall on the slow side compared with other brands however I think it may have been my application as Sambora tell me most people find dry time quite quick. I'll definitely have to test them out when not swatching. The lacquers are made in Australia which I love as I always prefer using and buying local made products. Definitely a brand to try especially if you enjoy the beach and with such a great selection of shades too!
Details: Sambora Beach Toes polishes are available from Sambora Beach Toes online store for $18.95 with free shipping on all purchases in Australia.
What do you think? Thanks for looking as always!
The products featured in this post were provided to me for consideration but this in no way influenced my review in any way. As always, my reviews are my 100% honest opinion. My Disclosure Policy can be viewed here.
Moyou London candy cane manicure
A super quick post with my first Christmas mani for the year! I hauled quite a few Moyou London plates recently and I've been wanting to try them out properly and the Festive collection plates are perfect for this time of year.

I used 2 coats of Cult Nails Tempest on all fingers except for my ring finger which I used 2 coats of China Glaze Ruby Deer. I then stamped the full candy cane design from Moyou London Festive collection plate 03 using Konad Special polish in white over the red accent nail and used my new Mundo de Unas stamping polish in red over the white nails. I didn't tape my nails off before stamping the red so it left my skin looking rather pink argh! I topped it all off with a coat of essence glitter topcoat for some very subtle shimmer.

I am loving my Moyou London plates and Mundo de Unas stamping polishes and I'm trying to resist the urge to buy more plates as a present to myself! But it is waaaaaay too tempting when the designs are so awesome.. Are you rocking Christmas nails at the moment? Are there any Christmas designs you want to see?
Thanks for looking as always!
I used 2 coats of Cult Nails Tempest on all fingers except for my ring finger which I used 2 coats of China Glaze Ruby Deer. I then stamped the full candy cane design from Moyou London Festive collection plate 03 using Konad Special polish in white over the red accent nail and used my new Mundo de Unas stamping polish in red over the white nails. I didn't tape my nails off before stamping the red so it left my skin looking rather pink argh! I topped it all off with a coat of essence glitter topcoat for some very subtle shimmer.
I am loving my Moyou London plates and Mundo de Unas stamping polishes and I'm trying to resist the urge to buy more plates as a present to myself! But it is waaaaaay too tempting when the designs are so awesome.. Are you rocking Christmas nails at the moment? Are there any Christmas designs you want to see?
Thanks for looking as always!
piCture pOlish Bette
Hello ladies! Where on earth has the year gone??? I can't believe it's only 3 weeks until Christmas! I am so not ready for the festive season. Today I have some quick swatches of the beautiful piCture pOlish Bette from the Opulence collection to share which I received a little while ago along with a few other new shades that I'll share soon.

Bette is a gorgeous light blue scattered holo. If you've been reading my blog for a while you'll know I love a good holo! It applied perfectly and 2 thickish coats is pictured.


Details: piCture pOlish Bette is available from the piCture pOlish online store and Network members for $12.
Thanks for looking as always!
The product featured in this post was provided to me for consideration but this in no way influenced my review in any way. As always, my reviews are my 100% honest opinion. My Disclosure Policy can be viewed here.
Bette is a gorgeous light blue scattered holo. If you've been reading my blog for a while you'll know I love a good holo! It applied perfectly and 2 thickish coats is pictured.
Details: piCture pOlish Bette is available from the piCture pOlish online store and Network members for $12.
Thanks for looking as always!
The product featured in this post was provided to me for consideration but this in no way influenced my review in any way. As always, my reviews are my 100% honest opinion. My Disclosure Policy can be viewed here.
OPI Big Apple Red
Today I have an oldie but a goodie shade for you all! Every girl needs at least one red creme in their stash and sometimes it's hard to choose the right one since there are about a million and one different reds out there. I tend to go for blue based reds but OPI Big Apple Red is a classic red and one that I reach for quite often these days. It's a gorgeous orange based red and is perfectly opaque in 2 even coats and dries to a high gloss finish.
is a gorgeous orange based red that I reach for quite often these days.


Details: Available from the usual OPI stockists for $19.95
Whats your favourite red polish? My long time favourite red is Rimmel's Double Decker Red (you can see a super old swatch of it here) but I have a really old bottle and they have a new formula now I think which is slightly different to the original.
Thanks for looking as always!
The product featured in this post were provided to me for consideration but this in no way influenced my review in any way. As always, my reviews are my 100% honest opinion. My Disclosure Policy can be viewed here.
is a gorgeous orange based red that I reach for quite often these days.
Details: Available from the usual OPI stockists for $19.95
Whats your favourite red polish? My long time favourite red is Rimmel's Double Decker Red (you can see a super old swatch of it here) but I have a really old bottle and they have a new formula now I think which is slightly different to the original.
Thanks for looking as always!
The product featured in this post were provided to me for consideration but this in no way influenced my review in any way. As always, my reviews are my 100% honest opinion. My Disclosure Policy can be viewed here.
Beach manicure
It is swelteringly hot here in Sydney at the moment and it's not even summer yet. Our place doesn't have air conditioning so I've been hiding out with all the blinds closed when not at work haha. With that in mind I thought it was time for a summery mani to go with the weather and what better way than with a beach manicure! It was a bit of a fail though because my top coat bubbled but I guess it unintentionally adds to the beach and sea theme so let's just say I did it intentionally ok!

I started off with 2 coats of Kester Black Blueberry Tart* (you can see my swatch of it here) as my base and then sponged OPI Glitzerland to the base of each nail for the sand. I then stamped wave design from Bundle Monster BM-509 using Konad Special polish in white and added a coat of China Glaze Snow Globe. To finish it off I added a gold shell stud and some different sized pearls.


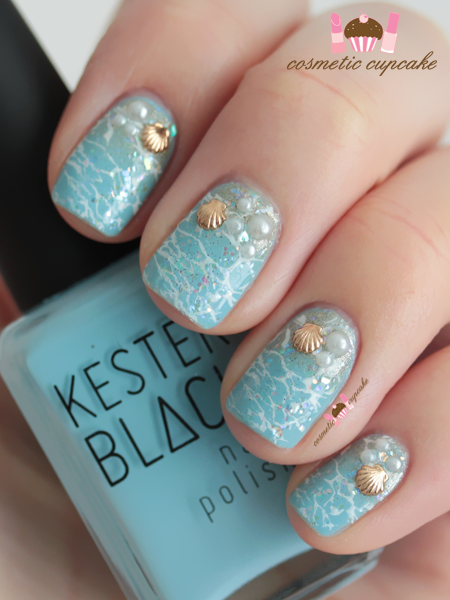
What do you think of my beach mani? Hope you're all having a fab weekend and for the Aussie girls that you stay cool! Thanks for looking as always!
* Product(s) provided to me for consideration but this in no way influenced my review in any way. As always, my reviews are my 100% honest opinion. My Disclosure Policy can be viewed here.
I started off with 2 coats of Kester Black Blueberry Tart* (you can see my swatch of it here) as my base and then sponged OPI Glitzerland to the base of each nail for the sand. I then stamped wave design from Bundle Monster BM-509 using Konad Special polish in white and added a coat of China Glaze Snow Globe. To finish it off I added a gold shell stud and some different sized pearls.
What do you think of my beach mani? Hope you're all having a fab weekend and for the Aussie girls that you stay cool! Thanks for looking as always!
* Product(s) provided to me for consideration but this in no way influenced my review in any way. As always, my reviews are my 100% honest opinion. My Disclosure Policy can be viewed here.
Dinner by Heston Blumenthal, London
Happy Thursday guys! I hope you've all had a good week so far. It's been a busy week but on Monday I got the jaw dropping news that I had won a very coveted reservation at The Fat Duck Melbourne for next year. And a CHEFS TABLE to top it off OMG!!!!! I'm literally beside myself with excitement even though there's still 6 months to go. So I thought it was about time I caught up with posts and shared some pics from lunch at Dinner by Heston Blumenthal in London from earlier this year. The husband and I treated ourselves to a splurge meal in each country we went to on our honeymoon and being the huge Heston Blumenthal fan I am Dinner was a must do! I would have loved to go to The Fat Duck but sadly we didn't have enough time to venture to Berkshire but luckily it's coming to us now woohoo!

Dinner by Heston Blumenthal is located at the Mandarin Oriental in Hyde Park and is a 2 Michelin Star restaurant. We would have loved to stay at the Mandarin Oriental but sadly our budget didn't stretch that far haha. It's such a beautiful hotel and in such a great location too with Harvey Nichols and Harrods only a stones throw away.

Dinner by Heston Blumenthal is located at the Mandarin Oriental in Hyde Park and is a 2 Michelin Star restaurant. We would have loved to stay at the Mandarin Oriental but sadly our budget didn't stretch that far haha. It's such a beautiful hotel and in such a great location too with Harvey Nichols and Harrods only a stones throw away.
NCLA x Hello Kitty Bows nail wraps
I may be nearing 30 (EEK) but my love of the super cute Hello Kitty still continues. It's her 40th anniversary this year so to celebrate NCLA devoted their latest nail wrap collection to everyone's favourite kitty. The range consists of 8 nail wraps featuring bright neon, bows and floral designs. There's a design to suit every Hello Kitty lover!

What they say:
"Do your nails instantly! No heat lamp, no drying time and no waiting required! All you need is clear polish. Try it, and you'll have a well-designed and polished look to complement any outfit in no time. ;) Channel your inner Hello Kitty with this bow-bedecked design that nods at her fab trademark accessory."

Being the nailhoarder collector I am I wanted all the designs but I was good and only purchased the floral and bows designs! Seriously SO DAMN CUTE.

The nail wrap sets include 26 ultra thin self adhesive nail wraps, an adorable NCLA Hello Kitty nail file and easy to follow instructions on the back of the packaging.

The wraps are super simple to apply in just a few quick steps - check out this video by the awesome Steph Stone on how to apply the wraps. First you clean your nails using acetone or polish remover; apply base coat; choose the correct wraps for your nails and apply by stretching until they fit perfectly and flatten firmly; file any excess using the nail file and then finish off with topcoat. I found the wraps really thin and flexible so they molded easily to the nail and made them easy to manipulate. It also only takes very gentle pressure to file the excess nail wrap off which means less stress to the natural nail which is always a plus!


I used the bow nail wrap as an accent nail for this mani and I paired it with OPI Big Apple Red and it took me literally only 10mins from start to finish before I had to rush out the door for dinner. Too easy!


Overall: I've never been a massive fan of nail wraps but these NCLA have me addicted. It also helps that these are Hello Kitty designs of course! I love that the nail wraps are super thin so they molded easily to my nails - other nail wraps I've tried feel really bulky on the nail which I find so annoying and end up picking them off straight away. You've got plenty of time to stretch and manipulate the wraps on the nail to get the perfect fit and there's a good range of sizes to fit most nail shapes. The sizes are geared more towards ladies with larger nail beds like moi so ladies with smaller nail beds might have to cut them down to size.
I haven't been changing my polish as regularly these days so I wore this mani for a good 5-6 days before I got sick of it and the wraps were still going strong. I applied a coat of top coat after a day or 2 and I experienced no lifting or chipping whatsoever. Removal is as easy as application with no polish remover needed by just pulling them off your nails! I am definitely taking these with me on my next holiday to minimise nail products I need to haul with me. The only downside to the NCLA nail wraps is that they are on the pricey side at $18US for only 1 or 2 manis but they are super convenient and you can stretch the manis out by using them as accent nails. NCLA are releasing new Hello Kitty Xmas wraps and you bet I'll be purchasing them too!
Details: The NCLA x Hello Kitty nail wraps are available from the NCLA online store for $18US.
Thanks for looking as always!
What they say:
Being the nail
The nail wrap sets include 26 ultra thin self adhesive nail wraps, an adorable NCLA Hello Kitty nail file and easy to follow instructions on the back of the packaging.
The wraps are super simple to apply in just a few quick steps - check out this video by the awesome Steph Stone on how to apply the wraps. First you clean your nails using acetone or polish remover; apply base coat; choose the correct wraps for your nails and apply by stretching until they fit perfectly and flatten firmly; file any excess using the nail file and then finish off with topcoat. I found the wraps really thin and flexible so they molded easily to the nail and made them easy to manipulate. It also only takes very gentle pressure to file the excess nail wrap off which means less stress to the natural nail which is always a plus!
I used the bow nail wrap as an accent nail for this mani and I paired it with OPI Big Apple Red and it took me literally only 10mins from start to finish before I had to rush out the door for dinner. Too easy!
Overall: I've never been a massive fan of nail wraps but these NCLA have me addicted. It also helps that these are Hello Kitty designs of course! I love that the nail wraps are super thin so they molded easily to my nails - other nail wraps I've tried feel really bulky on the nail which I find so annoying and end up picking them off straight away. You've got plenty of time to stretch and manipulate the wraps on the nail to get the perfect fit and there's a good range of sizes to fit most nail shapes. The sizes are geared more towards ladies with larger nail beds like moi so ladies with smaller nail beds might have to cut them down to size.
I haven't been changing my polish as regularly these days so I wore this mani for a good 5-6 days before I got sick of it and the wraps were still going strong. I applied a coat of top coat after a day or 2 and I experienced no lifting or chipping whatsoever. Removal is as easy as application with no polish remover needed by just pulling them off your nails! I am definitely taking these with me on my next holiday to minimise nail products I need to haul with me. The only downside to the NCLA nail wraps is that they are on the pricey side at $18US for only 1 or 2 manis but they are super convenient and you can stretch the manis out by using them as accent nails. NCLA are releasing new Hello Kitty Xmas wraps and you bet I'll be purchasing them too!
Details: The NCLA x Hello Kitty nail wraps are available from the NCLA online store for $18US.
Thanks for looking as always!
Subscribe to:
Posts (Atom)


